|
|

Power wiring complete!
Yay, finally got it all together! Made up a little common earth rail from a junction block, and assembled all of the wiring. The ceiling and side lamps, 12v and cigarette socket are all cabled up, as is the voltmeter and most importantly, the inverter. The inside of the cabinet is, admittedly, a rats' nest, but the bit that you actually see is pretty bling. Photos to come.
High-veg fuel blend experiment
It works! First I ran a half-tank of pump diesel through to flush out any of my previous concoctions. Then, with the engine warm, I added the following brew: 8l veg oil (Somerfield cheap and cheerful, probably a rapeseed/sunflower blend) 2l unleaded petrol 100ml acetone All mixed up in a big jerry can and shaken thoroughly. In the can, it sounded about as thick as diesel - not as gloopy as veg, not as thin and splishy as petrol. I will admit that as the fuel needle crept up I got a really nervy, tense feeling and was dreading some ghastly (expensive) noises... but no. So I took it for a drive, revved it, lugged it, and it was fine. The engine was a little more muted - it purred rather than tractor-clattered, which may or may not be a good thing. Exhaust smell is similar to a veg/diesel blend, a little more burned-smelling. Stopping for 20 minutes, it was fine to restart. Just the cold-start test left, for the next time I drive in to work. Crikey.
Twenty quid later...
...and I have a new split-charge relay for the leisure circuit. To be installed soonish.
Whoops! Blam!
Wired the power relay in backwards and routed the alternator output to earth! Disaster - nearly. Luckily the devilish cunning chaps at Mazda anticipated this boo-boo and all I lost were a couple of fuses - I could have fried the alternator. Some panic and a couple of fuses later and all was well again, though I have cooked the power relay. I'll get a fresh one. Lesson: Double-check your connections, and stick a small fuse in near to the relay when wiring it. I've added a 5A inline blade fuse.
Power wiring, part one
Got the battery-side power wiring done: a branch from the main 12v line, and an 80A inline fuse. The high rating is to cope with a load on the inverter, plus a drained leisure battery, when starting. Time to get stuck into the bench!
Picture time
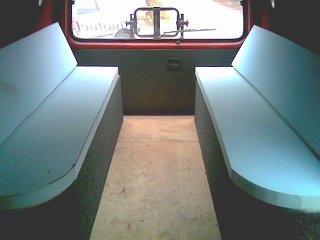
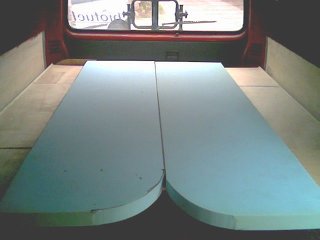
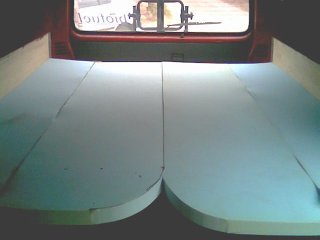
Off work early so here are some photos from the trusty camera-phone. First of all, here is the back of the van with both bench seats fixed in place. It's pretty snug, but I like it:  With the foam cushions in place, it starts to look very cosy:  Clearly, the cushions need to have their covers made up: I've got grey denim and zips waiting in the wings for a week of stitchy fun.
Cab electrics
Sorted the cab electrics today. Two things remained to be done: wire the stereo properly so it has a memory, and install the maplight. So I took the stereo out and removed the glove compartment, then found the clock's little power-plug, which has a permanent 12v line to it. Removing the fuse to the clock for a while, I spliced into that 12v line two extra lines: one for the light, one for the stereo. I ran the light's negative to earth, and then put everything back together. Result: one stereo that has a brain, and one nice maplight for the passenger/navigator.
Bedtime
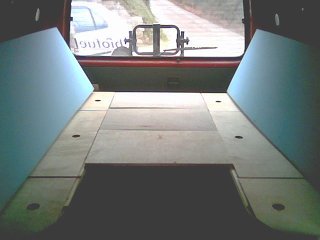
Made the bed slats today. Very simple: four bits of thick ply (left over from the floor) cut to just under 40x60cm. They fill the gap between the benches, sitting on their lips in the gap left for them, and four end-to-end take up almost all of the bench length. The side cuchions join the seat cushions to make a rather comfy bed.
Sparky tweaks
On the advice of the lovely members of the Self-Build Motor Caravan Club ( smbcc.co.uk), I've adjusted my electrical plans slightly: They've confirmed that using the alternator line to switch the leisure battery should be fine as it only comes live once the engine's turning. Since I've already gone through the trial of finding and running that wire, I'm glad I can use it! They suggested that I modify my plan to have big fat fuses - 80A maybe - near each positive battery terminal, so that's one at the main-battery end and one at the leisure end. I'll need to buy more parts. And I can stick with shared earths - probably splicing them into the earth strap that clamps between chassis and the leisure battery's negative terminal. Apparently weird ground loop effects are an audio thing - which must be where I got twitchy about them, as I worked for a while building analogue amplifiers with chassis earths!
Tightening the screws
...that hold the other bench down. Both benches are screwed into place now, so I can go ahead with the electrics and the bed slats. Here's a sketch of the electric circuit: 
Good progress
The bad panel has been removed, corrected, recarpeted and reinstalled. Both benches are finished and in place: one is fixed to the floor and I'll be doing the other one shortly. The benches are just screwed to the ply floor using lots of L-shaped metal brackets. I'll take lots of photos when I have a day with good light, because it's really coming together now. In other news, the map-reading lamp arrived. It's HUGE - way bigger than I expected, and very retro. I'll be installing it in the upocming Big Start On The Electrics, which will roughly go like this:
- Stereo out
- Identify the always-on line feeding the clock
- Earth off
- Decable main battery
- Decable secondary battery
- Splice into the clock line a junction block to feed the stereo memory and map lamp inputs
- Splice into the secondary battery feed a soldered junction to feed the leisure battery and a 40A fuse
- At the other end of that leisure feed, attach one end of the power relay. From here, I can work on the rest of the electrics safely
- Recable secondary battery
- Recable main battery
- Earth on
Spot the deliberate mistake
Got the right-hand panel up with tons of wiring behind it. With the chiselly goodness, it went up a treat, but... well, see if you can see what I got wrong with the *left* panel, that wasn't obvious until I had them both up.  Yup. I'll be taking that panel down and correcting that. And the moral of this story is: never measure stuff when surrounded by gabbling children!
Glory
Got home, put plastic up over the right-hand insulation, and then had another go at the left-hand panel. I figured, if the batten hooks won't fit, why not tweak them? Using a chisel I removed about 6mm from the inside of each batten hook on the back of the panel, leaving 15mm of material. And lo! It fits! So with a big dumb grin, I let the little girls next door help ("it's my turn to hold the screw!" "no, it's mine!") and got the panel fastened, and mounted the light and speaker. And it looks really, really good. Better than I hoped, really, and my reservations about those lamps are withdraw: they're slick. I've got the bench and one side cushions in there just to make it feel good. Photos tomorrow, because when I finished, it was dark. Also got a few bits of bench lid glueing overnight, and have started marking up the electrical panels on the second bench. Tomorrow is the other panel's date with destiny, and I'll chisel the batten before I even get started. Yay!
The itchy and scratchy show
Got the rockwool up on the right-hand side at lunchtime. Still not wearing gloves. Still wish I was.
Bitsen und gerbobben, ja?
Did a few bits and bobs and tidied up the workshop, er, kitchen. The overhead light is wired in place and -ahem- pop-riveted, as I had no suitable screws, and the leisure battery's earth strap is in place ready for the wiring. A good moment to take stock of what is left to do: Left panel: fit with some burly assistants. On hold until they get back! Right panel: tweak and dress, then fit. To do this week. Right bench: finish and dress this week, then fit both benches nice and parallel. Bed slats: once the benches are in place, measure up and cut some slats. Electrics: wire up the battery box in the right bench. Mock it up beforehand this week. Cushions: sew covers, this week. Curtains: fit cafe wire and make new curtains. Cab: Fit gooseneck navigator's lamp and at the same time, sort the stereo memory. Floor: carpet and fit repainted tread strips. Ceiling: stick up a clean headliner. Repaint the roof beams. Got to find a nice fabric and a high-temperature spray glue for that. That's not as ugly as I expected.
Too big and too floppy
...for one man to install. That's the rear left panel, which I finished last night and just spent two hours trying to install. Nope. That's a two-man job, one to push the centre in to locate the batten hooks, and one to push down at the same time. Damn damn damn. The panels both need to go up before I can realistically put the benches in - all the space is needed in the fight against flobble. So I won't be completing this for another week at least. I'll press on with finishing the other components and sorting the electrics, but that's a bit of a setback and a gumption trap. I wanted the large parts to be installed before the others get back, and I'm miffed.
One bench finished
This is the finished left-hand bench. The covering is carpet tile, and I'm stoned on the glue :) The three lids are hinged and held with magnetic catches; they don't come all the way to the edge so that the bed-slats will have some room to locate. All that remains for this one is to line it up in the van and screw in some little L-brackets to relevant bits, to hold it to the floor. 
Slow Progress
Who is it that said "a job takes twice as long to complete as expected"? He's right. Still skinning the benches, but they're looking nice. Made small plywood plates to hold the low and high voltage bits, which will look nice. Yaaaaaaaawn! Must get grey carpet tiles for the benches, tomorrow ASAP.
How cool is this?
 Yes, that's the 12v leisure battery, a mains inverter, and a lava lamp. The lava lamp's drawing 240v through the inverter. Wow! Mains in a box! I'm totally geeked out at the coolness of this! Now, I'll be building the battery, inverter, and some 12v connections into the forward part of the right-hand bench seat. It's going to be a cosy fit but should provide all the power I'll need. Later, I might rig up a solar panel or wind generator to top up the battery when the van isn't being driven, but that's another project.
Getting there...
Here's a snap of the interior roughly laid out. Plodding on :) 
More woodwork
More good progress today. Finished the carcasses of the benches, and got the right-hand panel dry-installed. Lost the light before the left panel could be finished, so I'll come back to that tomorrow. I've also been planning the cushion layout, which I'll buy the raw materials for tomorrow. Something to do indoors while the light's bad.  I'll be glad when all this woodworking is over. I'm not what you'd call a natural carpenter. Oh, but I have to really praise the cheapy mitre block I got at B&Q: good square cuts just where I want them. Can't go wrong with that. To do: finish the left panel. Prep the mounting points for speakers and lights. Route the cables. Work out the amount of carpet needed for the panels. Get stuck into the electrics. Skin and lid the benches.
Benchy benchy, very benchy
Spent the day working on the bench seats. Have ended up with two Ikea kits: the tops and bottoms are assembled, screwed-and-glued and will sit overnight to go off. Tomorrow I'll screw and glue the uprights into the mix and see what's what. Still need to get some material for the seat tops, probably just 6mm ply, but B&Q were out. Schedule for tomorrow: assemble the benches. While they dry, arrange the hidden battens on the rear panels and dry-fit. Place the benches and draw lots of lines on everything, prior to cutting various holes in the panels for screenwash, speaker, lamp and wiring access.
One step forward, two steps back
A less than ideal day: got the rear panels cut nicely, but I'll need to pack the right-hand one to make it fit flush. I'll fir battens tomorrow and offer the panels up dry while I make the benches. Alas I started on the first bench seat only to discover that I'd bollixed up the plans - the electrical gear wouldn't fit inside - and had bogus materials. An expensive cockup! But I've redrawn the design of the seat, worked out the materials needed, and will go shopping tomorrow first thing.
Preparing the leisure wiring
Laid the leisure wiring prior to fitting the rear wall panels. This involved some creative drilling in order to get an invisible routing, but a little violence soon sorted everything. The lines for speakers and reading lights are now in place. As a bonus, while laying that wiring, I discovered that the ceiling wires were in fact working door-switched cabin lamp wires, so I rerouted those to just over the inside of the side loading door and wired in a small clear festoon. At the same time I've wired up the cable for the main overhead lamp. And while in the shops, I've picked up a lovely lovely 500w mains inverter. I'll test it with a lava lamp shortly!
Fettling
Laid the right-hand speaker cable and prepared some battens for the week's work.
Fitted the roof vent
I fitted the roof vent today. That should keep the van pleasant when it's got sweaty, breathing bodies inside it, and should mean that the van doesn't get damp and nasty inside when standing around. That's important to prevent rust and rot! I'm fitting a Fletter 2000 spinning vent, which I've trimmed down slightly to fit between the narrow ribs on the roof of the Mazda.  |
The vent needs a central air hole and four fixing holes: these are the pilot holes drilled through the roof between the ribs. I've marked them from the vent body and just drilled straight up through the foam headlining into the sky. |
 |
Go mad with a jigsaw and a metal blade: sawing holes in the roof of your van is scarily easy and rather good fun. Look Ma, I can see clouds and birdies! This hacked hexagon will let me offer up the top part of the vent assembly to get the body trimmed correctly. |
 |
I've offered up the vent body, marked the hole accurately, and cut more closely to that line with the jigsaw. Then I've tidied the burrs up with an angle grinder, and masked up the rough area for priming. The hole isn't perfect and isn't especially pretty but it doesn't have to be: the two halves of the vent sandwich the hole but there is no pipe. |
 |
A couple of coats of primer will prevent corrosion on this previously-bare metal. It ain't exactly art, but like the hole, it doesn't have to be. |
 |
Job done: the top of the vent spins in the wind. Nice and tidy. The bit you can see rotates on a spindle which is boltedto the roof; the inside part is the other half of the sandwich. |
 |
Inside: the vent's grille is discrete and can be closed easily. It snap-fits over the inside part of the body, so can be removed - I'll probably take it off and paint it to coordinate with the interior when I dress the ceiling. |
That's the second panel finished
The second panel is up: a bit of a wrestling match, and a lot of work for a very plain bit of fuzzy wall, but it's there. The hidden batten is working nicely though locating it under the insulation and in a roasting van was, er, exciting. And sweaty. Top and bottom batten screws are dressed with the same screw caps as the door panel. In other news, I've located a Flettner (spinning black plastic) roof vent on Ebay, so that'll be fitted soon. Not a moment too soon, either - it's scorchio! Next to do: mock up the cable runs, then mark up and offer the driver's side rear panel. This panel will have cutouts for cabling to/from the electrical box, and speaker and lamp mounts. It may also have another document pocket, we'll see.
Sliding door panel finished.
Took down the door panel, fitted cargo mesh (made by weaving knicker elastic - classy, me) and re-glued the carpet tiles with Evo-Stik. Evil stuff, but very good glue - a bit fiddly to use as it's a contact glue, so you have ot line everything up just right before pressing. Panel complete, looking nice.
Evo-Stik Datasheet
On request, the nice folks at Evo-Stik sent me this datasheet - the important thing is the temperature range. 65 degrees C ought to be plenty, especially with a vent. Happy bunny - I can crack on with the panels now.
Steady progress on panel #2
Ticking along nicely: I've cut and trimmed the panel to size and measured up for fixing holes. Drying overnight are the hook-shaped battens that fix halfway up the panel: these link with the hook-shaped battens on the van wall to provide a fixing with no visible bits. That's the plan, anyway...
New glue, incredble new glue...
Did a glue experiment today wth Evo-Stik Impact adhesive - the good stuff with toluene in it. I've glued a big scrap of carpet tile to some ply and fixed it to the ceiling of the van. It can sit there for a few hot days, and we'll see whether or not it stays the course. If it does, I'll use it to reglue the carpet tiles as it's much easier to find than the Dunlop glue.
One panel is up!
I'd already made the panel and offered it up to the battens. Now for assembly: 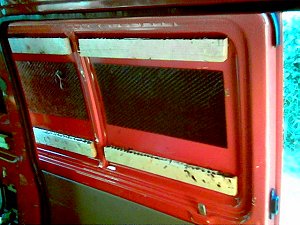 These are the battens, glued to the panel with Sikaflex (awesome black rubbery glue used in marine applications). The black stuff is a bit of anti-drumming rubber (which didn't have much effect, to be honest). 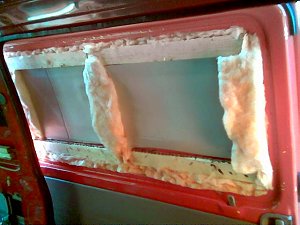 Up goes the insulation. I've used mineral wool for most of it, and sheets of thin foam where space is limited. This is held in place with spray carpet adhesive. Remember where every book says use gloves and a mask and goggles? I didn't. You should. Cough, cough, wheeze! 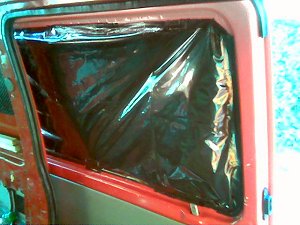 Next is a moisture barrier, to keep people's wet breath off the metal panels (if the insulation got damp it would never dry and the door would rust from the inside out). This barrier is just a plastic rubble sack and it's held up with gaffer tape. The panel will screw through the barrier into the battens, which I think ought to be OK. 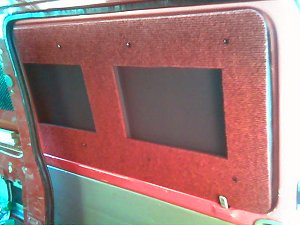 Finally the panel goes up: it's held on with 1" #8 woodscrews into the battens; the black spots are concealer covers for the screw heads. The two black recessed panels are to be magazine/map racks, once I get some elastic mesh in place. Of course the next day was scorching hot and the carpet started sagging from the panel - I might have to reglue with something better than carpet glue!
At last, starting on the electrics
Finally a day off, some gumption, plenty of light and good weather. Got the sliding door's battens replaced with ones the correct size, and prepared the panel for the top of the door: I need to get a Workmate or similar so I can finish that as it will have a recessed magazine space and blackboard. Sorted out a bunch of niggles, gave the thing a wash, and - gasp - started on the leisure electrics. The leisure electrics have been stalled while I try to feed a 12V battery line and a 12V relay line to the back. The battery line was easy, but locating the relay line, which must only be on when the engine is actually running, was harder. Well, I bit the bullet today and hunted one down on the alternator - which entailed stripping out most of the cabin!  Once I'd got the driver's seat, passenger seat, battery cover, alternator cover and driver's seat pan removed, it was easy (!) - just fit a junction terminal into the right line and send the wire aft. The two cables are now snaked back to the rear panel, where they will emerge into the electrical cabinet in the right-hand bench seat. Next to do: get a Workmate and make the sliding door panel; make the forward right panel; fit insulation and moisture barrier to the sliding door and forward right panels; get an A3 blackboard; find some bungee mesh for the magazine rack; find about 8m of upholstery fabric for the walls.
It's curtains for you, buster
Fitted some rudimentary curtains between the cab and body today, but they're crap, so they'll just have to do until I can get some nice curtain-track and decent fabric. Also put in the first part of the leisure electrics, the main 12v line toward the back. Still have to track down a 12v line for the relay, though.
Veg-tastic
I've finally been registered with the taxman as a legal user of veg oil for fuel! Yay! I'll be running on a 25-33% blend of vegetable oil in regular diesel (we can't get biodiesel around here) and will write up a full step-by-step howto on dealing with the taxman shortly. And now I need a neat sunflower sticker to put on my fuel cap. I'm really really chuffed to have got this sorted. Chuffed to bits.
New gearbox, super quick!
Okay, it took me a while to find the cash for the new gearbox and propshaft that are needed. It'll be back on the road soon, though. I used www.find-a-part.com, specified my parts and breakers were phoning me within - get this - seven minutes. So one will be delivered to my local garage in a day or two. How cool is that?
Slight setback...
"Ease off on the throttle, Ripley. We've blown the trans-axle, you're just grinding metal." - Hicks, AliensSo I'm tooling across the Severn Bridge when there's this almighty, horrifying BONK from below and everything starts shaking like Ragnarok in a dustbin. Turns out my propshaft bearing is now less of a bearing and more of a mangled lump. Half a mangled lump. Off to the garage, then...
Attack of the Space Worms!
Slapped up some Q-pads onto the exposed wall panels. This will reduce drumming in the sides when driving, with any luck. Lots of soundproofing in the back - a quiet night's sleep should be a given Also, fed the van to the Space Worms. They nested in its voids and will defend my from giant robots, you see. No? Oh, all right, they're not real space worms. They're actually the gooey expanding foam filler that I have used in all the rear compartment voids. This is to reduce the number of resonant cavities and add more insulation. The worms (actually Polyfilla Expanding Foam Filler), and the Sikaflex batten glue need a while to cure, so the van looks and smells like a sci-fi set at the moment.
Lord Mount-Batten, I presume?
 Today I put up the wooden battens which will hold the wall panels in place. The principle is simple: while the floor takes the weight of the panels, the battens hold them to the van's curved shape and keep them snug. There are three battens for each panel. The panel is screwed to the upper and lower battens with concealed or decorative screws (I'm thinking of mirror-dome ones for a vaguely rivetty, steampunk effect), while the centre batten fits onto a concealed centre batten on the panel. This allows me to more easily fit and remove the wall panels again and again - handy for modifications or, to start with, for getting the sizing right and fixing upholstery, speakers, lights, etc. The battens are glued onto the metal van walls using Sikaflex 291 marine adhesive. This stuff is awesome: it comes in a caulking-gun cartridge and costs around a tenner a shot. Applied, it is very, very grabby and goes off in about an hour. Then it cures for a month and ends up as a sort of utterly indestructible rubber. The key thing is that it is still rubbery. That makes it great for absorbing road and engine vibrations without letting go. So tonight, the battens are held in place with some tape while they set. Tomorrow, I start on the wall panels.
The Ever-Changing Backside
Here's a little before-and-after animation to show what I have done with the rear end. The big black metal frame is the bike carrier. I'll finish this off with a tint on the window (for privacy more than styling) and maybe some "sag wagon" graphics. 
Busy at the back
Took the towball off and replaced it with my Hollywood bike carrier - that carries three sensible bikes or four greyhounds, and hinges down to allow the back door to open. Dead solid, dead good, and well worth £110 if you're a regular bike-carrier. Unfortunately, it also completely obscures the number plate, so I've had to get a new one in the little square style and fit that plus a new lamp to one side of the door. All very lovely, now, and looking pleasingly quirky. Meanwhile I've been shopping fit to burst, and have most of the things I'll need to finish the shell. Particularly good was the Cooly thermoelectric coolbox - that's mini-fridge to you - which I got for a mere £25! I still can't find my Flettner vent, though. These are the spinning roof vents you see on every other tradesman's van, and is ideal for ventilating mine too. You'd think that scrapyards would have loads of 'em, but no! They're hens' teeth - and new, they're over £100, so one in decent nick from a scrappy would be massively preferable. If you happen to have a spare, Gentle Reader, drop me a line!
The floor laid, plus bits
Right, the floor is laid. I decided to leave the 2" gap created by a cock-up in measuring at the back: when all is done, that'll be the least important place and anyway, with the edge-strip over the carpet, it won't matter. Honest. Moving on, I've stripped some of the wall panels prior to putting up the sheet ply walls. More to strip, before deciding where to fix battens to hold everything up. I've also bought most of the leisure circuit - 110Ah deep cycle battery, fuses, wire, etc - and measured up for the bench seats, which will be boxes 350mm tall and 400mm deep running the length of the back section. Next: more bits for the leisure circuit, and design thoughts about those benches.
...and ongoing...
A happy evening screwing down floor panels until the drill's charge gave out, lit only by romantic inspection lamplight and serenaded by a couple of hours of nice dirty punk. Nearly there, and the road noise is definitely improved.
The floor, ongoing...
  Working on the floor this weekend, despite killer migraines. This pic shows the soundproofing felt, which goes on top of the underbody-sealed floor. On top of that, there's floor insulation, then the ply. I'm fixing it all down with self-tapping screws directly into the van's floorpan (No.5 screws, 3.5mm pilot holes, and every time I drill, bits of felt get wrapped around the drill bits!
Starting on the floor
Things move on apace! The noise-deadening pads arrived, so I have generously covered the wheel arches with 'em. I'll have plenty left for the panels, doors and hopefully the cab floor as well. A good spend of £40 for 20x 200x100mm pads, that. After covering the wheel arches (which reduced the "tang" when flicked to a "tonk"), I gave the floor a coat of Waxoyl underbody seal (Halfords, £15 for a big tub). This is to further deaden that road noise and, of course, to seal the floor against rust. The bottom of this van is now pretty well tanked, and with a roof vent as well, should be protected against rust from condensation, breathing while asleep, and wet kit. In other news, the 8-ball gear knob arrived and was immediately fitted. Nice.
Tunes!
Swapped the OEM stereo (basic and tinny) for one I've had knocking around for a couple of years: a decent Clarion with four (yes, four!) speaker outputs and a CD input. Had a bit of a job running the speaker cables to the back of the van and had to bodge it a little, and I still need to sort out the memory and illumination power lines, but I'm dead chuffed that it's in. Car audio is like voodoo to me. This has removed a rate-limiting step: I can now fit the walls and speakers whenever I like; the memory and CD on the player itself can come whenever.
Fresh Oil
Ran my first tank of blend last night, 15% veg oil in diesel. Sweet as a nut and a lovely doughnutty smell from the exhaust!
Zeno's Paradox
The van has had a new timing belt fitted (so that's good for about 75,000 miles) and the rocker cover gasket has checked out OK. Unfortunately, the speedo is dead: there's a little plastic gear in the gearbox which drives it, and that has fallen in and been all et up. The repair would involve furtling around inside the gearbox, which is not cheap, and since the speedo is not an MOT requirement, I'll leave that on the back-burner for now. Maybe when I have my manual, I'll have a go myself (!). Meanwhile, I have a van that moves, but doesn't say it moves - Zeno's paradox on wheels. The really good news is that my Man Who Does reckons the van is nice and sound and there's nothing ugly about it. I've washed the interior out (scrubbing brush, bucket, soapy water - no fancy tech for me) and everything is ready to lay the floor this weekend.
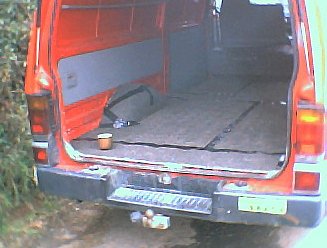
Sweeping the floors
Lifted the old rubbery floor-mat today to reveal ganky old noise-damping felt underneath. Got all of that out, so that I'm down to bare metal (3x1.5m!) in the back. Brushed out much of the cack and Hammerited the wheel arches where the paint was most scuffed. Also, installed Buddha; stuck some trim back in place; checked and topped up all the fluids; unblocked screenwash jets; de-stickered and cleaned all the glass. There are rubbery noise-reduction pads over much of the floor, so I have less of that to do than I expected. I'd better explain my evil plan for the floor, as that is the element I'm going to be focusing in the coming days: The steel floorpan has factory-fitted rubbery noise-reduction pads on. I'll add more in some of the gaps, and plate the wheel arches with them. Then I'll WaxOyl the floor to stop corrosion. After that, I'll lay some noise-reduction felt to hush the road noise, and a layer of that foil-backed foam stuff you get behind radiators, to keep the warmth inside the body. Following that, there's a sheet of 10-14mm marine plywood as the floor proper, screwed down with big fat self-tapping screws into the chassis members, countersunk so they don't bite later. Later, when all the woodwork is done, I'll carpet most of the interior: I plan to leave the wood bare for now so I can build the bench seats onto the floor direct. There's no wiring going under the floor, and I don't plan on a table socket - that's too camper. So the floor is just this sheet of rot-proof, warm, quiet ply. Nice. (Shopping list for the week: 2x boxes of Q-pads; 3x1.5m marine plywood, felt and foily stuff; couple of cans of spray WaxOyl; couple of dozen long fat self-tapping screws; surform and jigsaw blades)
The basic van
The basic van is a Mazda E2200, a 5m-long diesel panel van in fetching red. It's about ten years old and has 130,000 miles on the clock, the engine seems to run sweetly and there is hardly any rust. Ideal for a project like this. As it's a diesel, I'll be considering running on various biofuels: biodiesel if I can find a supplier; vegetable oil / diesel blend if I can't; and pure vegetable oil if I can afford and handle the conversion. For the moment, it's got to get a new timing belt (just a safety thing on old diesels, that) and have the speedo checked out.
Getting Started
Okay, here's the deal: I've got hold of a big red panel van that I'm going to convert into a super-comfy, super-chilled adventure wagon. What do I mean by adventures? I mean bike rides, diving, hiking, ridiculous kite expeditions - that sort of thing. And what do I mean by super-comfy? I mean plush: quiet, warm, cosy. Somewhere to come back to and flop out or crash overnight. Somewhere where you can relax with a cold beer or a hot cup of tea and listen to some chilled-out tunes. This is not a camper van: there are no plans to cram a family in it for a fortnight, or to live in it, or to do extended catering. If I want catering, I'll go to a cafe. It's a rolling base-camp. Oh, and it has to be done with minimal acceptable environmental impact. Which, given that it is a van, could be challenging!
|